Building a High-End AI Desktop
Introduction
Running large language models locally has always been a game of compromise. You either spend \$10,000+ on consumer GPUs that can barely handle 70 B parameter models, or you dream about enterprise hardware you’ll never afford. The Grace-Hopper platform—Nvidia’s unified CPU-GPU superchip architecture—represents the kind of dream-rig AI infrastructure LocalLlama drools over, with systems typically costing well over \$100,000 and exclusively available to data centers and research institutions.
So when I stumbled across a Grace-Hopper system being sold for 10K euro on Reddit, my first thought was “obviously fake.” My second thought was “I wonder if he’ll take 7.5K euro?”.
This is the story of how I bought enterprise-grade AI hardware designed for liquid-cooled server racks that was converted to air cooling, re-converted it back to water cooling, survived multiple near-disasters (including GPUs reporting temperatures of 16 million degrees), and ended up with a desktop that can run 235B parameter models at home. It’s a tale of questionable decisions, creative problem-solving, and what happens when you try to turn datacenter equipment into a daily driver.
If you’ve ever wondered what it takes to run truly large models locally, or if you’re just here to watch someone disassemble $80,000 worth of hardware with nothing but hope and isopropanol, you’re in the right place.
The Deal
Early this year, while browsing r/LocalLLaMA/new, I came across a ridiculously good deal. How good? These were the specs for the server offered for 10K euro, and a serious upgrade to my 4x RTX 4090 rig:
Specs:
- 2x Nvidia Grace-Hopper Superchip
- 2x 72-core Nvidia Grace CPU
- 2x Nvidia Hopper H100 Tensor Core GPU
- 2x 480GB of LPDDR5X memory with error-correction code (ECC)
- 2x 96GB of HBM3 memory
- 1152GB of total fast-access memory
- NVLink-C2C: 900 GB/s of bandwidth
- Programmable from 1000W to 2000W TDP (CPU + GPU + memory)
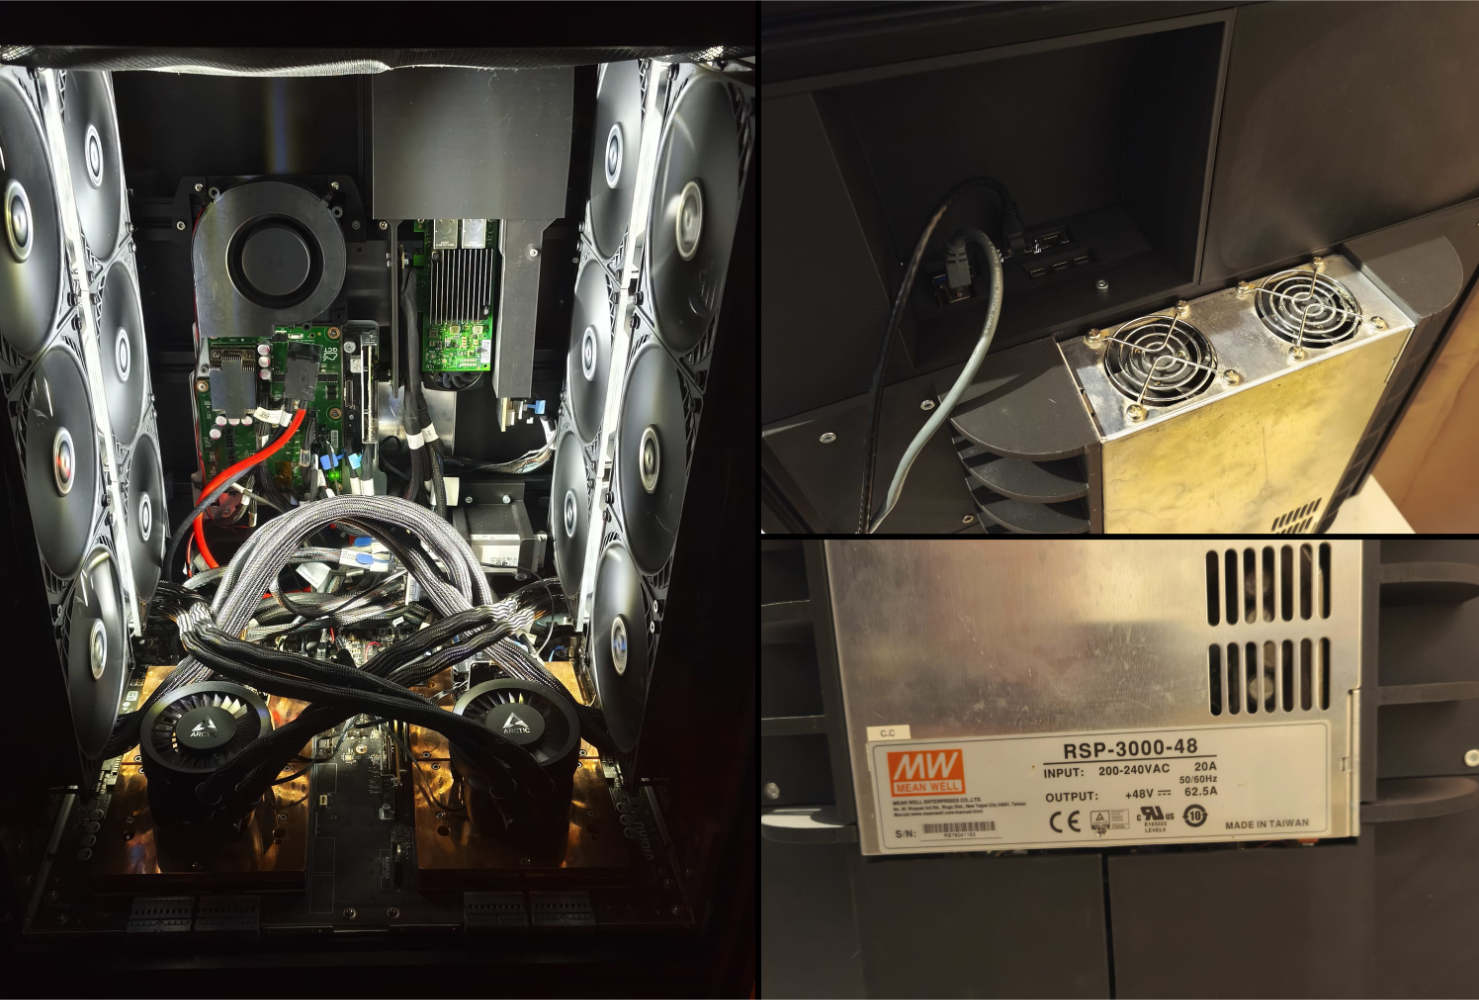
- 1x High-efficiency 3000W PSU 230V to 48V
- 2x PCIe Gen4 M.2 22110/2280 slots on board
- 4x FHFL PCIe Gen5 x16
UPDATE:Since I bought this, DDR5 RAM prices have become insane. 960GB of fast DDR5 now costs more than what I paid for the whole Grace-Hopper system 🤯
Obviously fake I thought, because
- H100s cost about 30-40,000 euro each, and this system has two of them
- Grace-Hopper NVL2 systems are basically not for sale for consumers anyway!
The Reddit thread explained the reason the system was being sold cheap:
The main reason why is that it is a Frankensystem converted from liquid-cooled to aircooled. Also it is not very pretty and not rackable, because it has a 48V power supply attached. It is originally directly from Nvidia.
I immediately offered to buy it, because why not? If it was a scam, I could always back out, but I wanted to be first in line!
It turns out I live near the seller, and he runs an online shop that sells modified Nvidia server equipment as desktops. It still seemed pretty risky, so I did some research and found a video review of one of his Desktops on Youtube. With the deal now seeming at least plausible, and the seller only a two-hour drive away and agreeing to take cash, it was time to take a Bavarian road trip.
I arrived at a farmhouse in a small forest, and met Bernhard the proprietor of GPTshop.ai. He showed me a nice workshop (plasma cutters, an electronics lab, etc.) from which he fabricates custom cases for the high-end H100 desktops he builds. These desktops seem pretty damn nice, so it’s unfortunate that his webshop gives off shady vibes; the business registration in the Cayman Islands definitely doesn’t help. What I can say though is that this item was heavily discounted, and not the fancy ultra high-end desktops that he usually sells.
Disclaimer: I have zero affiliation with GPTshop.ai beyond handing them a stack of cash and receiving a dust-covered server in return. If this were a sponsored post, they probably wouldn’t let me mention the 16 million degree GPU temperatures or the part where I had to free-solder components while praying to the electronics gods.
Disassembling the Grace Hopper server
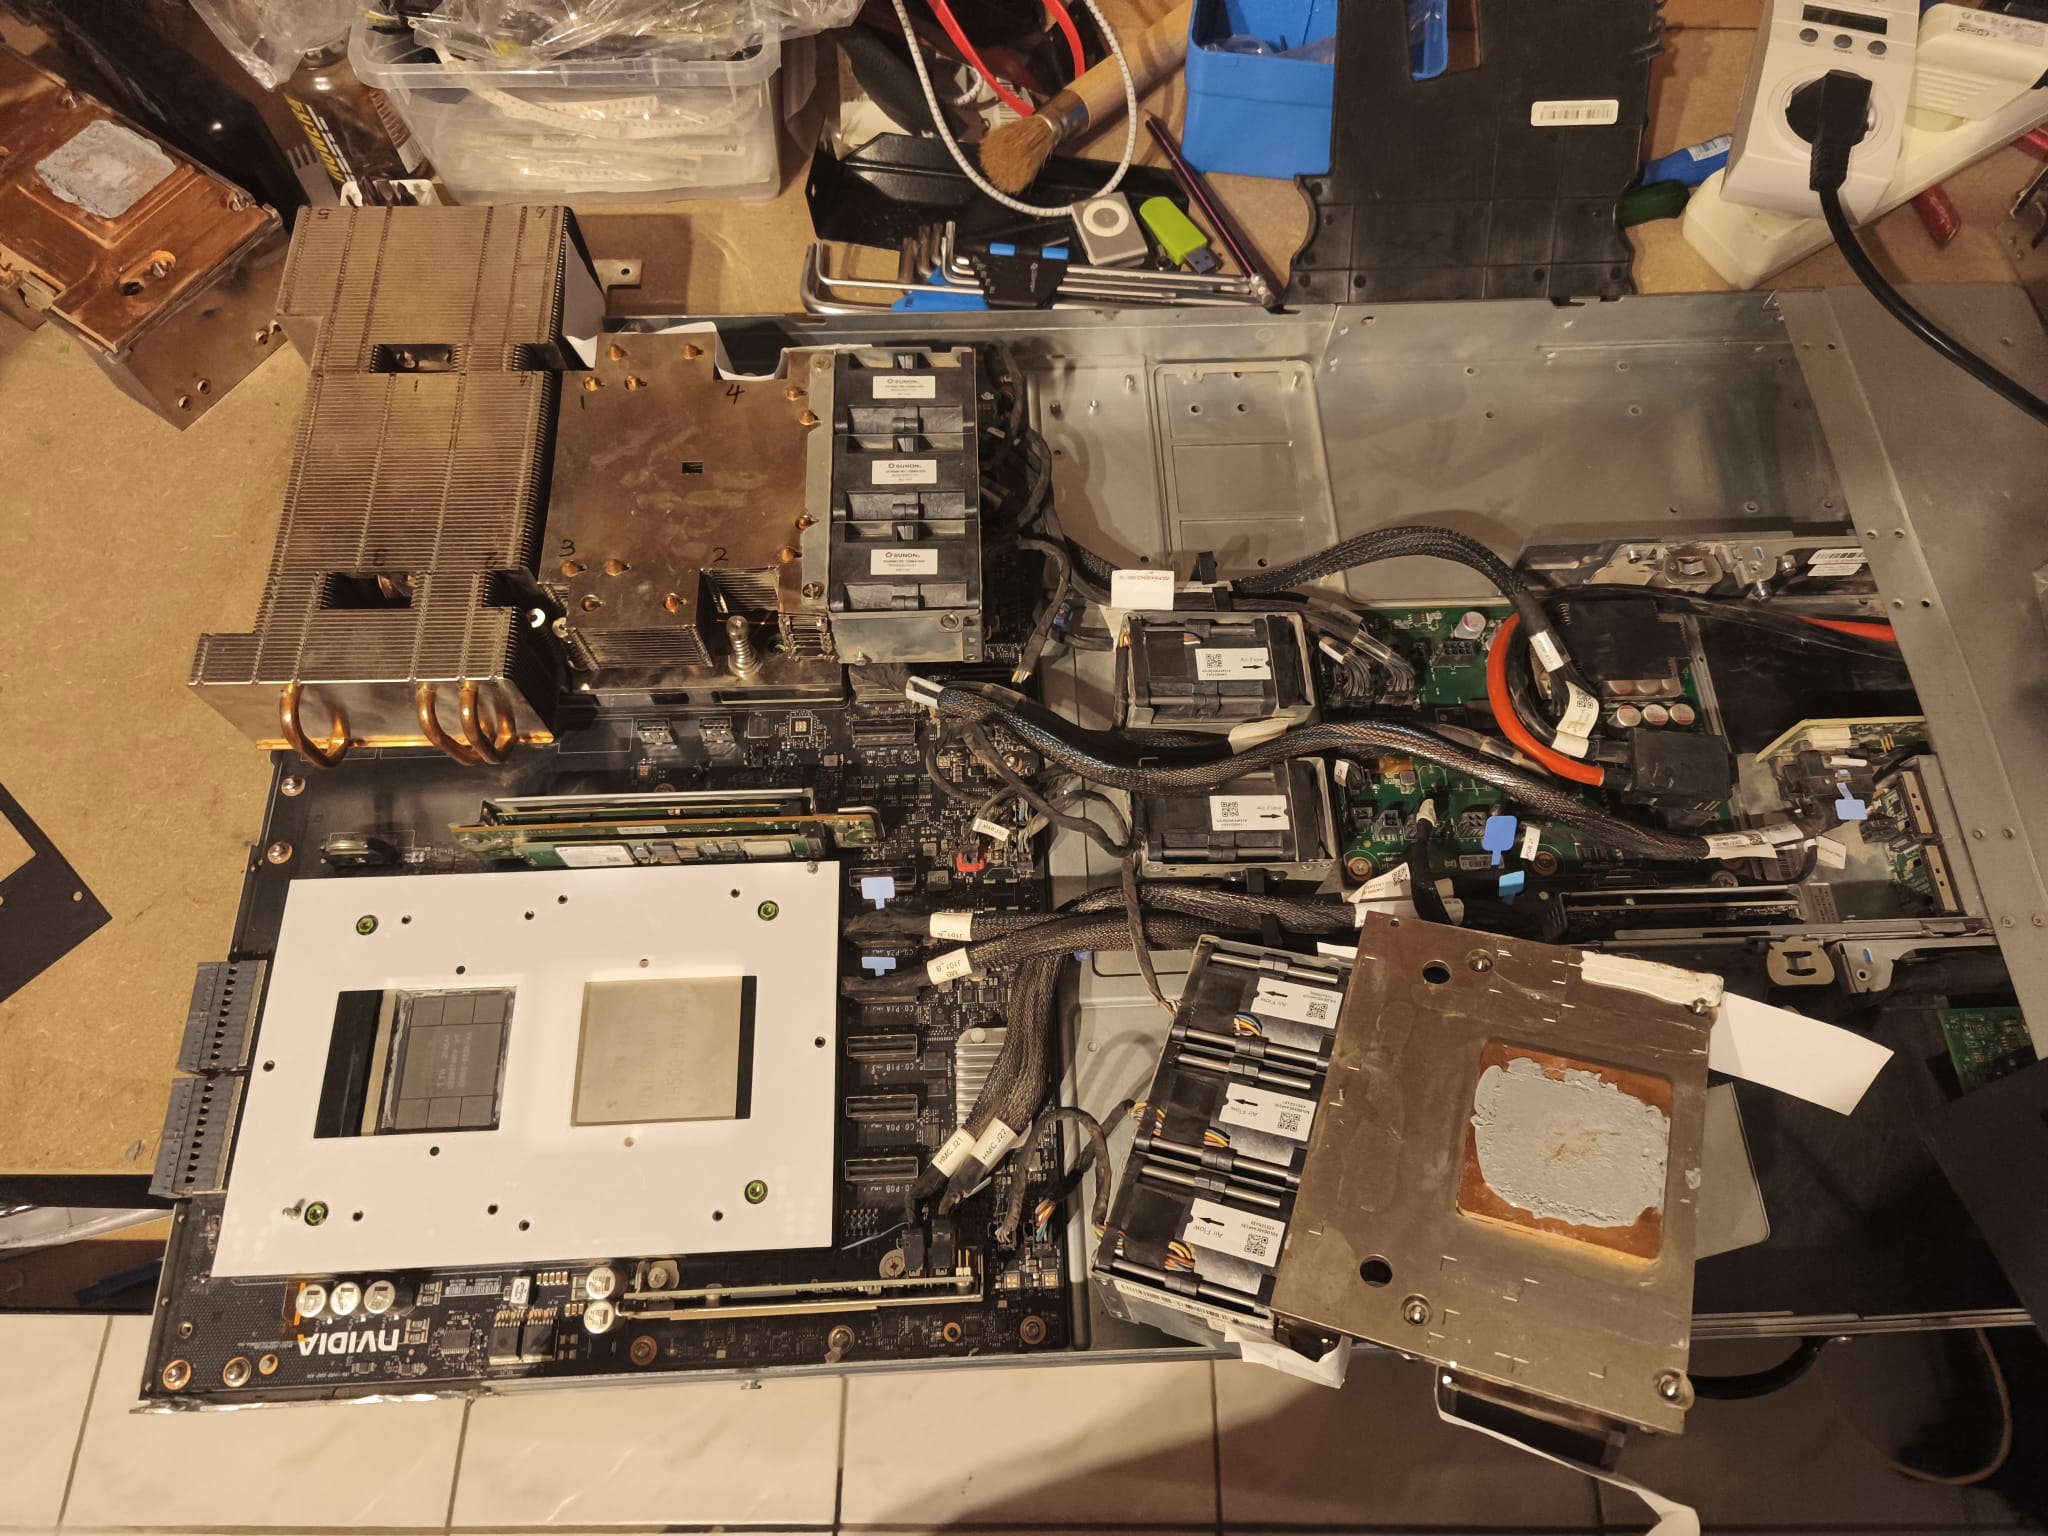
The server itself was not in great condition. These things run extremely loud and high-throughput fans, and these had sucked in a lot of dust, coating the mainboard so heavily I couldn’t tell the color of the PCB. However, it booted up and ran OK, so I handed over a wad of cash, strapped it into the backseat of my car with the seatbelt (it weighed ~20 kg), and drove it home.
Did I mention it’s loud? Firing up the system is physically painful. There are 8x Sunon dual-fan modules, and each is as loud as a powerful vacuum cleaner, but with a much higher and more annoying pitch. With all 8 running at full power, hearing protection is necessary - I could hear the system running in my basement with the windows closed from 50 meters away! My wife immediately (and quite fairly), banned its use at home. We both work home-office and it was simply too loud for online meetings. But I had other plans anyway…
First things first, I of course quickly decided and then proceeded to strip down the server, after first photo-documenting the various connectors between the various PCBs, modules and mainboard.
Cleaning the Server
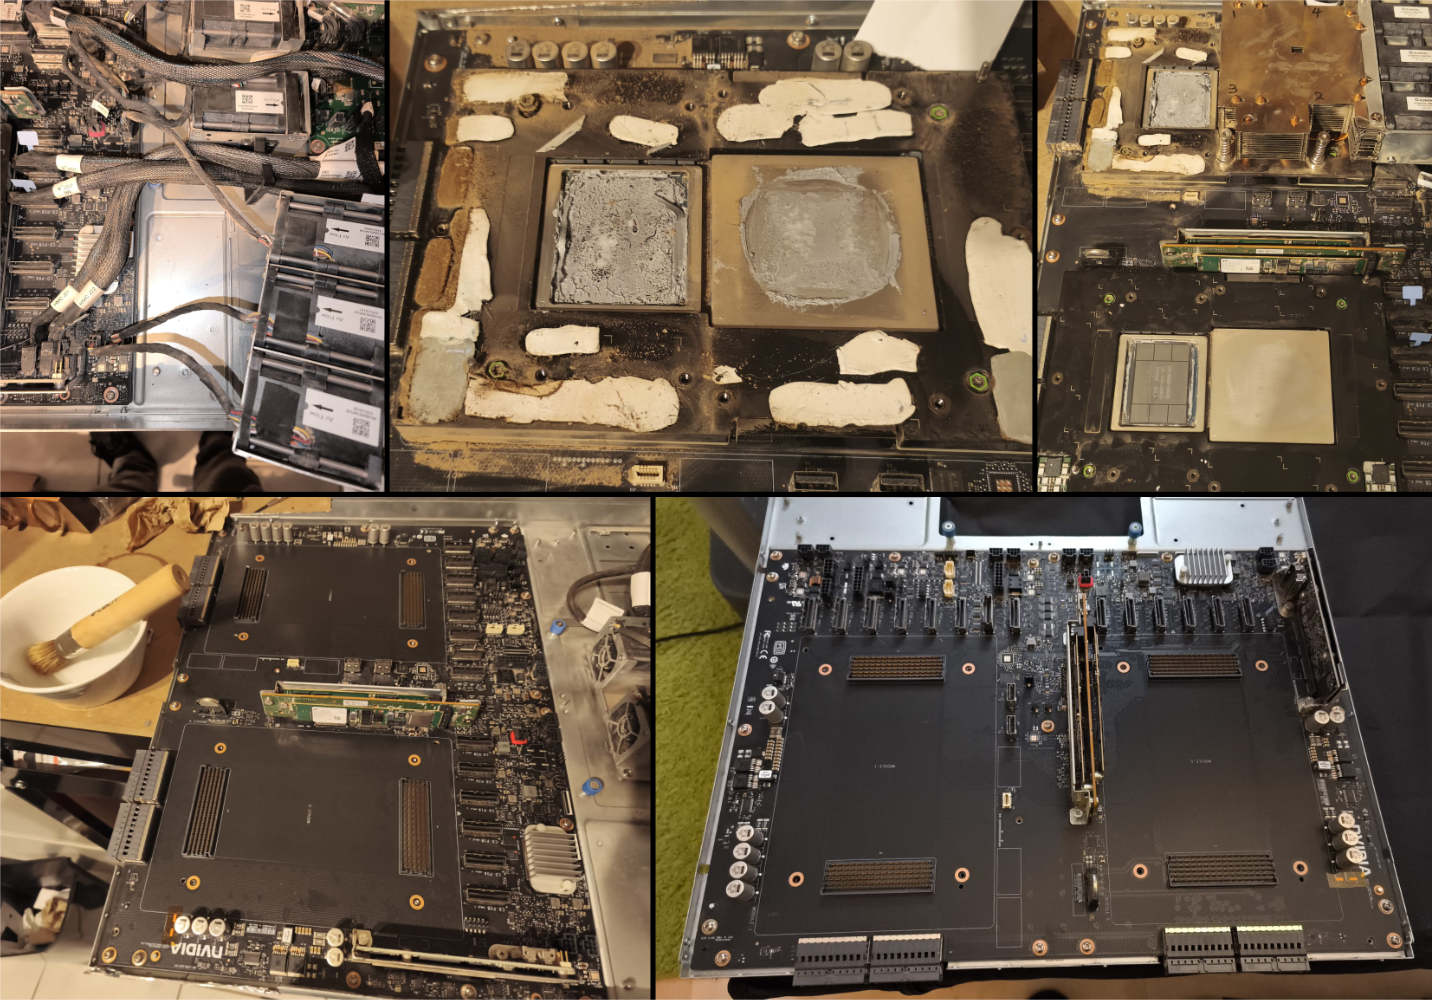
The majority of the dust was vacuumed off during disassembly, but there was clearly a lot more under the Grace-Hopper modules. After removing those as well, I decided to go with a full washdown of the mainboard.
I purchased a few litres of Isopropanol, and with a soft brush I went over the whole board a few times to get the remaining fine dust from inside connectors and between SMD-component pins.
I suspected there might also be dust inside the Grace-Hopper modules, but actually, I really just wanted to pop them open to poke around.
The mainboard went on my heated floor to dry for a week, while I moved on to replacing the cooling system.
A new Water Cooling system
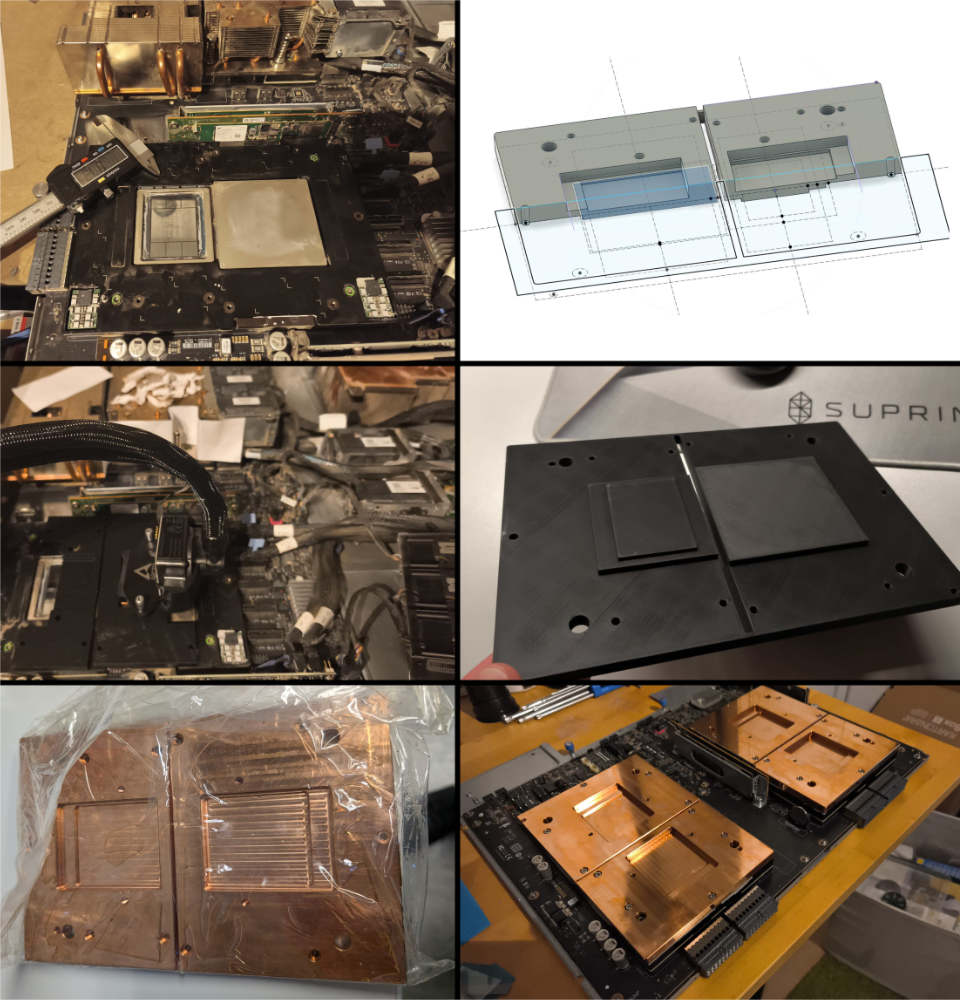
I had looked into building a custom water-cooling block, but I was worried about leaks, when I found cheap all-in-one water cooling systems for ~40 euro each on sale. Two per GH200 module would be sufficient, so I carefully measured the dimensions of the GPU die and CPU, as well as screw locations, and threw those into Fusion 360 to model up an adapter block.
I have a Bambu X1, which came in very handy for prototyping the adapter blocks. The tolerances have to be very tight, so I printed several cut-away versions to make sure there was solid contact to the bare GPU die, and a safe margin from contact to fragile parts.
The parts were then sent for CNC milling, and were delivered as the mainboard was finished drying. After using yet more isopropanol to clean off the machining oil, they were mounted without much fuss.
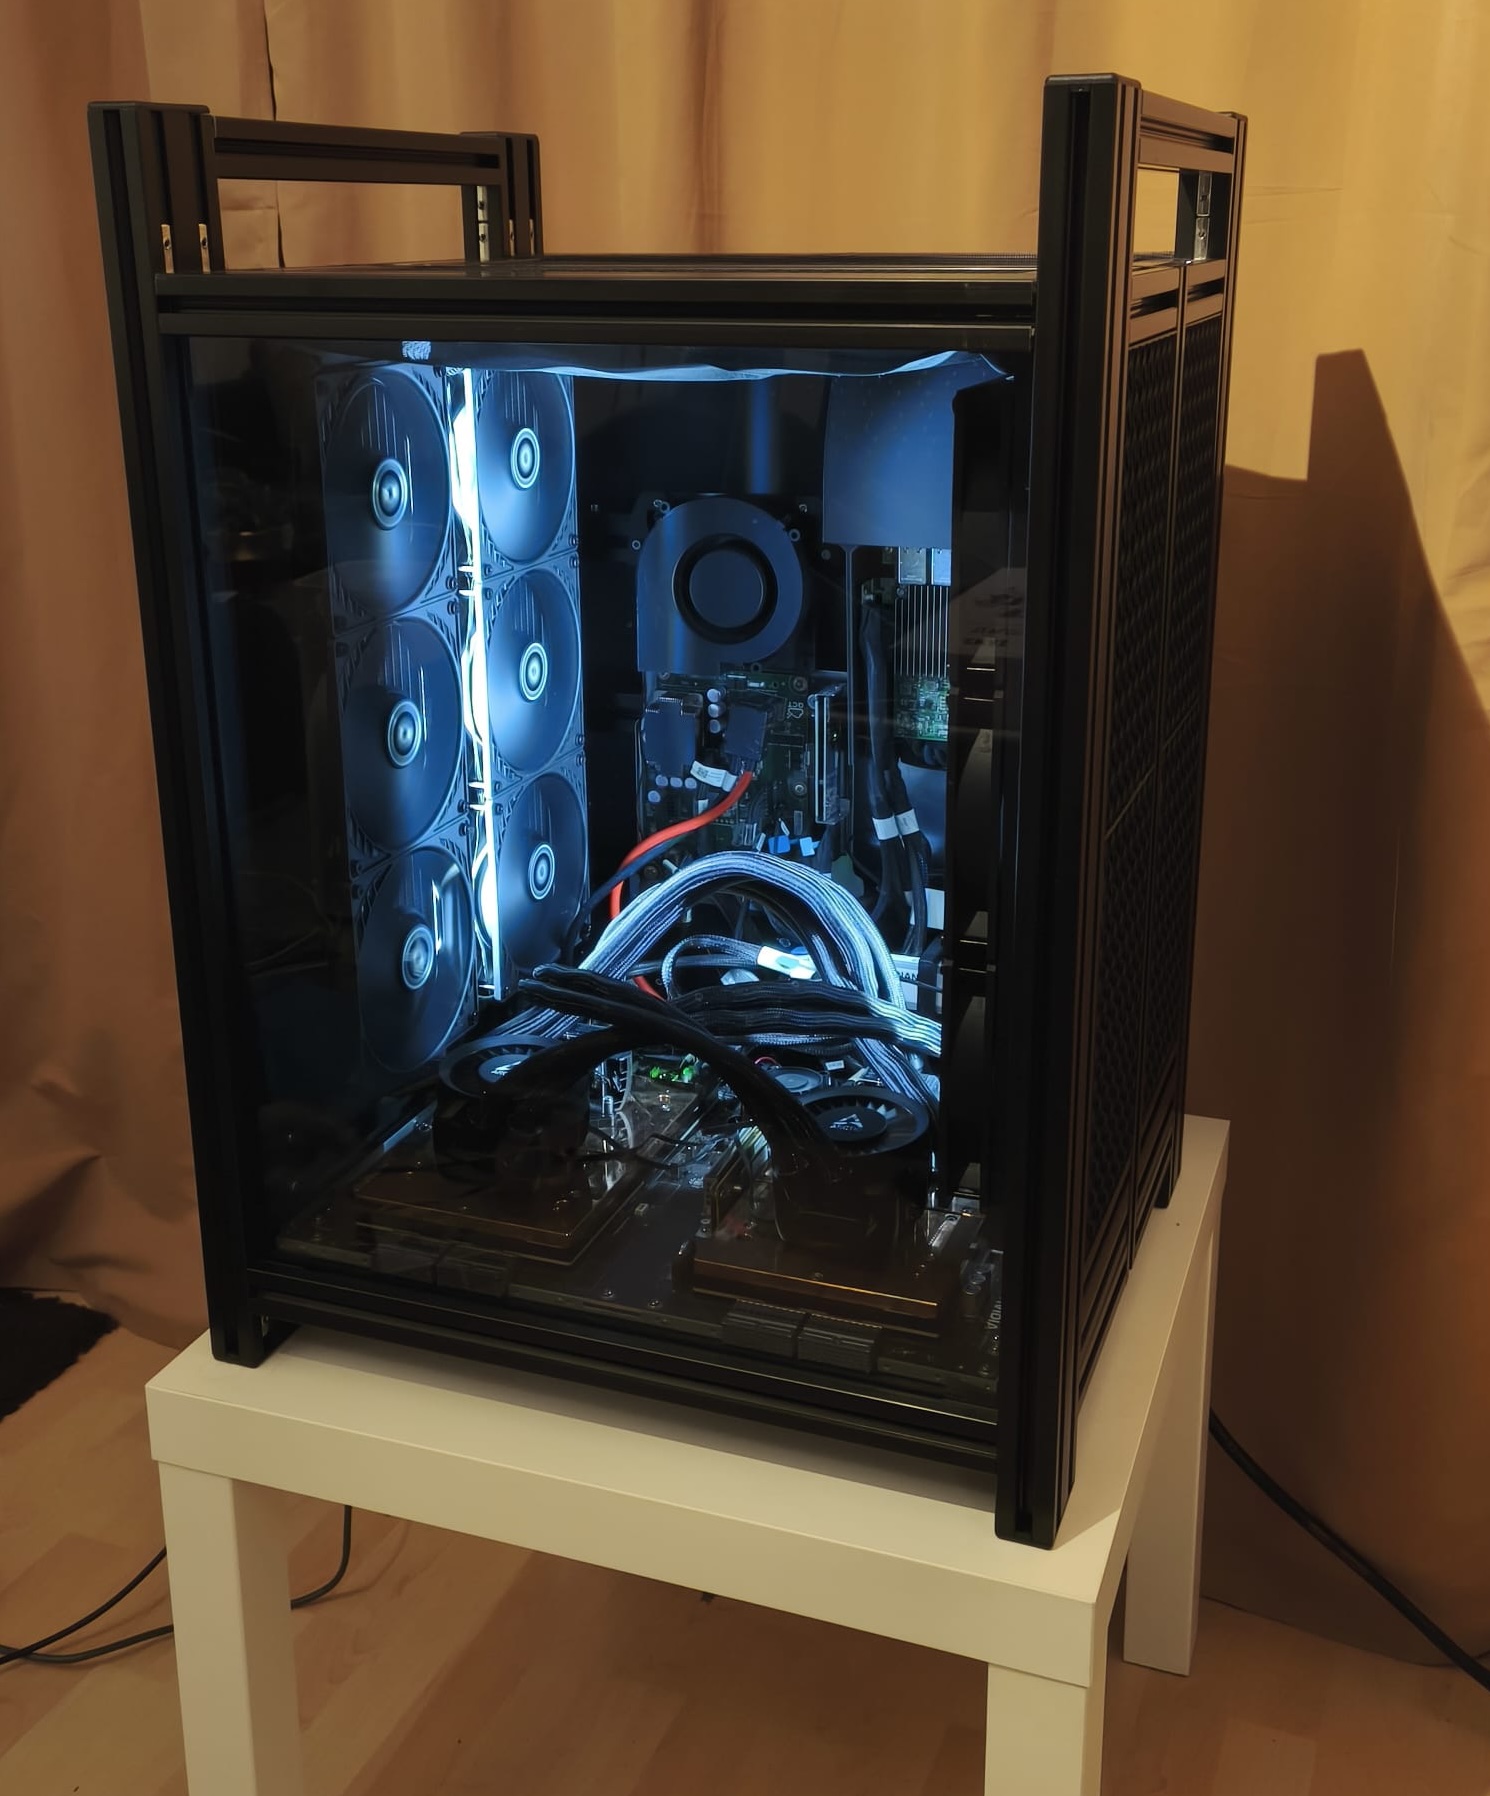
Assembling the Desktop
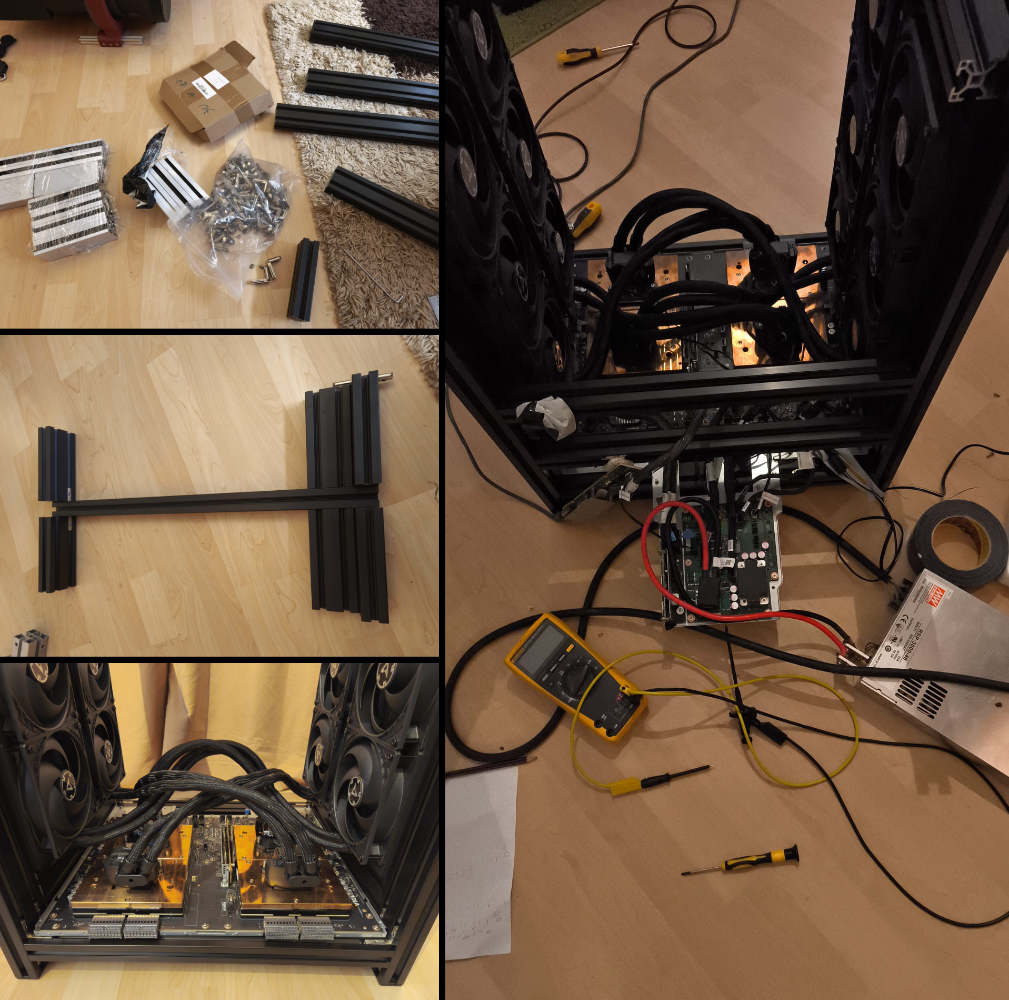
My go-to material for this kind of project is ProfilAlu from eBay. It’s cheap, stiff, and delivered pre-cut for assembly. I put together a design in Fusion 360, and had the parts in a few days. The various mounts however were much more work. I needed to design a few dozen custom mounts for the various PCBs and air-filter fixings; this used up a few kilos of filament to get things just right.
Disaster(s)
Things that go ‘POP’ in the night… 💀
I have discovered that one of the most terrifying sounds you will ever hear is a ‘pop’ followed by a ‘fizzle’ coming from the $80,000 mainboard you just worked on. The smell of magic smoke moments later generates more of a sense of dread.
The idea was simple enough: I have 8 powerful fans that each must draw a huge amount of current and run at 12V. At the same time, I have four water cooling systems that also run at 12 V. Simple right? I swap the regular consumer 3-pin fan connector from the Arctic cooler with the weird server fan connector, and I have can run them off the mainboard with fan speed control!
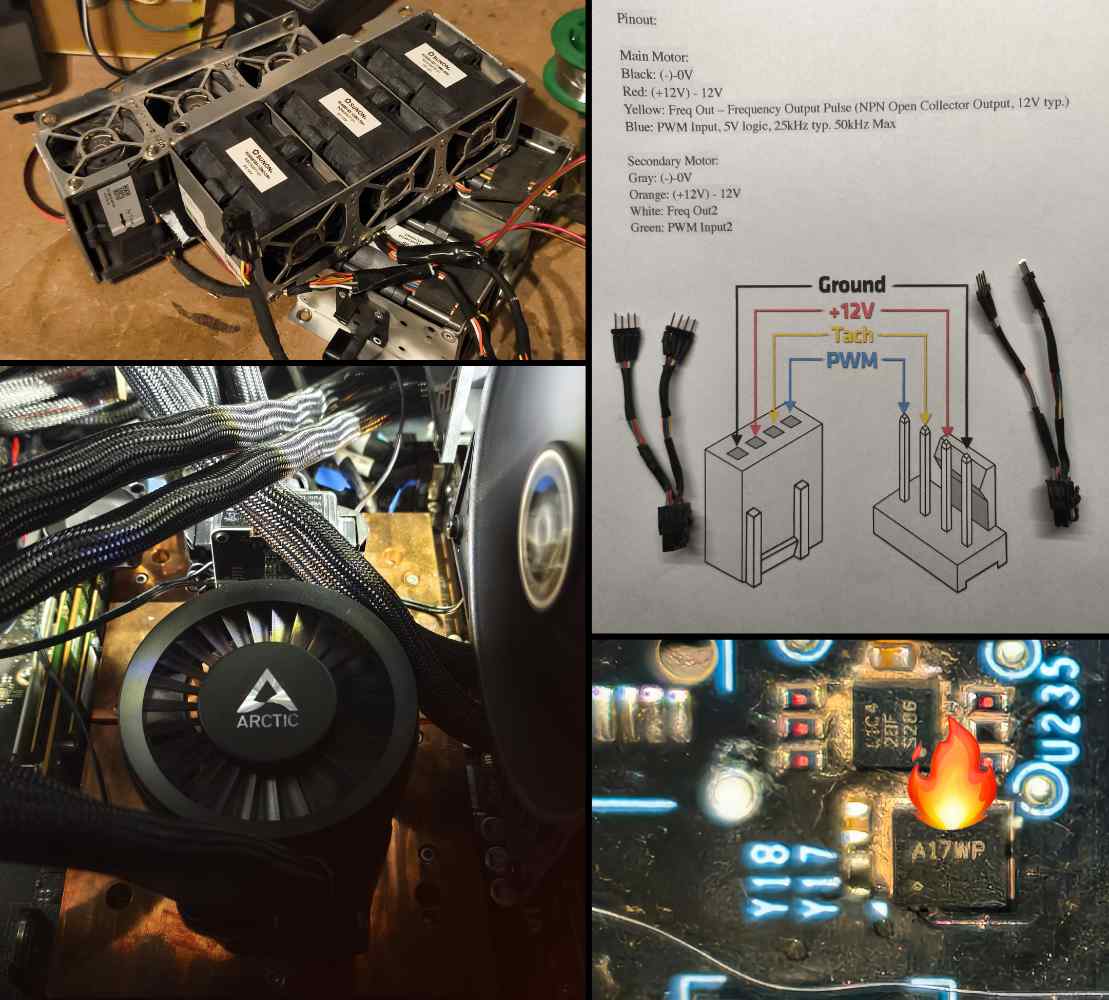
Problem 1. What the heck were these mainboard fan connectors? They looked like tiny Molex, but I didn’t recognize them. I think I finally found some for sale, but they were ~20 euro each and I have principles! So, I mapped out the wiring and with some snipping and soldering, I had adapters made and the system rebuilt. Then came the pop and fizzle… My estimations on the current draw must have been a bit off.
Problem 2. After disassembling the fancy adapter I just made and rewiring the fans, I found out that several fans didn’t work any more. Hmmmm. Swapping the various fans around made it clear: some of the mainboard fan headers weren’t working. I grabbed my DIY thermal camera (a topic for another blog post), and looked all over the board, before spotting what looked like a warm MOSFET (basically a switch). I googled the markings, but no results.
Problem 3. I needed a new way to power the 12V AIO Water Coolers. The main power supply provides 48V at 62.5 Amps, which seemed a bit high, and I wasn’t ready to run them in series after the last small ‘incident’. I picked up a cheapy 12V-5A power supply from Amazon, because ‘next day delivery’, and it was under 10 euro. When this arrived, my cooling system was operational again!
Critical Fan Errors
The system didn’t start to boot anymore. Checking the logs, I saw 6 critical errors, one for each dead fan driver among the 8 pairs:
4 08/06/25 19:24:08 CEST Fan FAN_6_F Lower Critical going low Asserted Reading 0 < Threshold 2156 RPM 5 08/06/25 19:24:08 CEST Fan FAN_6_R Lower Critical going low Asserted Reading 0 < Threshold 2156 RPM 6 08/06/25 19:24:08 CEST Fan FAN_5_F Lower Critical going low Asserted Reading 0 < Threshold 2156 RPM 7 08/06/25 19:24:08 CEST Fan FAN_5_R Lower Critical going low Asserted Reading 0 < Threshold 2156 RPM 8 08/06/25 19:24:08 CEST Fan FAN_8_F Lower Critical going low Asserted Reading 0 < Threshold 2156 RPM 9 08/06/25 19:24:08 CEST Fan FAN_8_R Lower Critical going low Asserted Reading 0 < Threshold 2156 RPM…
With the fans removed, the BMC (Baseboard Management Controller) immediately panicked, and shut down the mainboard to prevent thermal damage, even with the water coolers in place. So, I disabled the fan-check subsystem.
1
2
3
4
5
# stops the service for the current session
systemctl stop phosphor-sensor-monitor.service

# prevents the service from starting on the next boot
systemctl disable phosphor-sensor-monitor.service
Who needs hardware monitoring? ¯\_(ツ)_/¯
Nuclear Fusion?
Great! I could start the boot process, and even reach login! But only about 1 time in 4… Not optimal. And even logged in, the server would crash within 2 minutes.
Looking into the BMC logs, I saw:
| Sep 23 08:20:18 | oberon-bmc | shutdown_ok_mon[1478] | event: FALLING EDGE offset: 26 timestamp: [571.615238550] |
| Sep 23 08:20:18 | oberon-bmc | power-status[1493] | event: FALLING EDGE offset: 18 timestamp: [571.632491062] |
| Sep 23 08:20:18 | oberon-bmc | shutdown_ok_mon[545] | SHDN_OK_L-I = 0 |
| Sep 23 08:20:18 | oberon-bmc | shutdown_ok_mon[545] | Asserting SYS_RST_IN_L-O to hold host in reset |
| Sep 23 08:20:18 | oberon-bmc | shutdown_ok_mon[545] | gpioset SYS_RST_IN_L-O = 0 |
| Sep 23 08:20:18 | oberon-bmc | power-status[697] | gpioset SYS_RST_IN_L-O = 0 |
| Sep 23 08:20:18 | oberon-bmc | power-status[697] | Set SYS_RST_IN_L-O=0 |
So, a Critical Failure at 08:20:18:
- SHDN_OK_L-I signal goes low (falling edge detected)
- This immediately triggers a shutdown sequence
- System powers off within ~30 seconds of successful boot
But why?!!? I had shut down the hardware monitoring.
Diving deeper into the logs:
| Oct 05 10:15:00 | oberon-bmc | ipmid[520] | thresholdChanged: Assert |
| Oct 05 10:15:00 | oberon-bmc | ipmid[520] | thresholdChanged: Assert |
| Oct 05 10:15:00 | oberon-bmc | ipmid[520] | thresholdChanged: Assert |
| Oct 05 10:15:00 | oberon-bmc | satellitesensor[2351] | Sensor HGX_GPU_1_TEMP_1 high threshold 92 assert: value 1.67772e+07 raw data nan |
| Oct 05 10:15:00 | oberon-bmc | satellitesensor[2351] | Sensor HGX_GPU_1_TEMP_1 high threshold 89 assert: value 1.67772e+07 raw data nan |
| Oct 05 10:15:00 | oberon-bmc | satellitesensor[2351] | Sensor HGX_GPU_1_TEMP_1 high threshold 87 assert: value 1.67772e+07 raw data nan |
| Oct 05 10:15:00 | oberon-bmc | phosphor-fru-fault-monitor[524] | /xyz/openbmc_project/logging/entry/496 created |
| Oct 05 10:15:00 | oberon-bmc | phosphor-fru-fault-monitor[524] | /xyz/openbmc_project/logging/entry/497 created |
| Oct 05 10:15:00 | oberon-bmc | sensor-monitor[499] | Starting 1000ms HardShutdownAlarmHigh shutdown timer due to sensor /xyz/openbmc_project/sensors/temperature/HGX_GPU_0_TEMP_1 value 16777214 |
Warning: Your GPU should not reach 16,777,214 Celsius during boot. Imagine what would happen under load!
This took some time to debug, as I was quite sure the sensors could not physically handle reading temperatures over 16 million Celsius… But then I noticed something interesting about that specific number:
| Decimal | Binary | Hex |
|---|---|---|
| 16,777,214 | 1111 1111 1111 1111 1111 1110 | 0xFFFFFE |
This is 2²⁴ - 2, which is suspiciously close to the maximum value of a 24-bit unsigned integer. In the hardware world, this is the equivalent of a sensor throwing up its hands and screaming “I have no idea what’s happening!” When hardware can’t read a value properly—whether due to a loose connection, damaged circuit, or initialization failure—it often returns the maximum (or near-maximum) representable value. It’s like the digital version of a shrug.
The logs confirmed this theory: seeing 1.67772e+07 (16,777,214) wasn’t evidence that my GPU had achieved nuclear fusion temperatures 🔥—it was evidence that the temperature sensor had simply stopped working. And if a sensor error is intermittent, the most likely culprit is a loose connection or physical damage.
After spending way too long pursuing software solutions (because who wants to disassemble everything again?), I finally accepted the inevitable and broke out the screwdrivers.

I happened to have bought a new microscope earlier this year, and it turned out to be the perfect tool for diagnosing and fixing the issue. Near one of the modules, I found some damaged surface mount components. The damage must have happened after cleaning, probably during the reassembly of the modules with the copper adapters. They weigh over 2 kg, so a slight bump would have easily caused this damage. Amazingly, the tiny components were still attached to the traces, and so I could measure them easily: a 100 nF capacitor, and 4.7k resistor (both of which I had on-hand, as they are standard values for decoupling circuits). The bad news? I had huge “0805” sized parts (2mm long), these were tiny “0402” (1mm long). And one of the traces was just gone.
With some very fiddly soldering, and scratching off the solder mask on the PCB to expose more trace, I was able to ‘free solder’ the parts into a wonderful 3D sculpture which was then liberally coated in UV-curing mask resin, set, and then held in place with sticky tape. Very professional. After reassembly, the system booted smoothly.
Final Touches
I 3D printed a few extra parts:
- Mounts for the E1.S 8TB SSD I found cheap online
- A full rear-panel, that mounts the 3KW 48V power supply
- Cool-looking mesh to protect the water-cooling radiators and dust filters
Getting the actual GPU working was also painful, so I’ll leave the details here for future adventurers:
1
2
3
4
5
6
7
8
9
10
11
12
13
14
15
16
# Data Center/HGX-Series/HGX H100/Linux aarch64/12.8 seem to work!
wget https://us.download.nvidia.com/tesla/570.195.03/NVIDIA-Linux-aarch64-570.195.03.run

# Tell the driver to completely ignore the NVLINK and it should allow the GPUs to initialise independently over PCIe !!!!   This took a week of work to find, thanks Reddit!

# create a modprobe config file:
sudo nano /etc/modprobe.d/nvidia-disable-nvlink.conf

# add the driver option
options nvidia NVreg_NvLinkDisable=1

# update the boot files:
sudo update-initramfs -u

# reboot
sudo reboot
Benchmarks
That’s what you’re here for, maybe? I have only just started, but after compiling the latest Llama.cpp version using 144 cores in 90 seconds, here’s some benchmarks on larger LLMs:
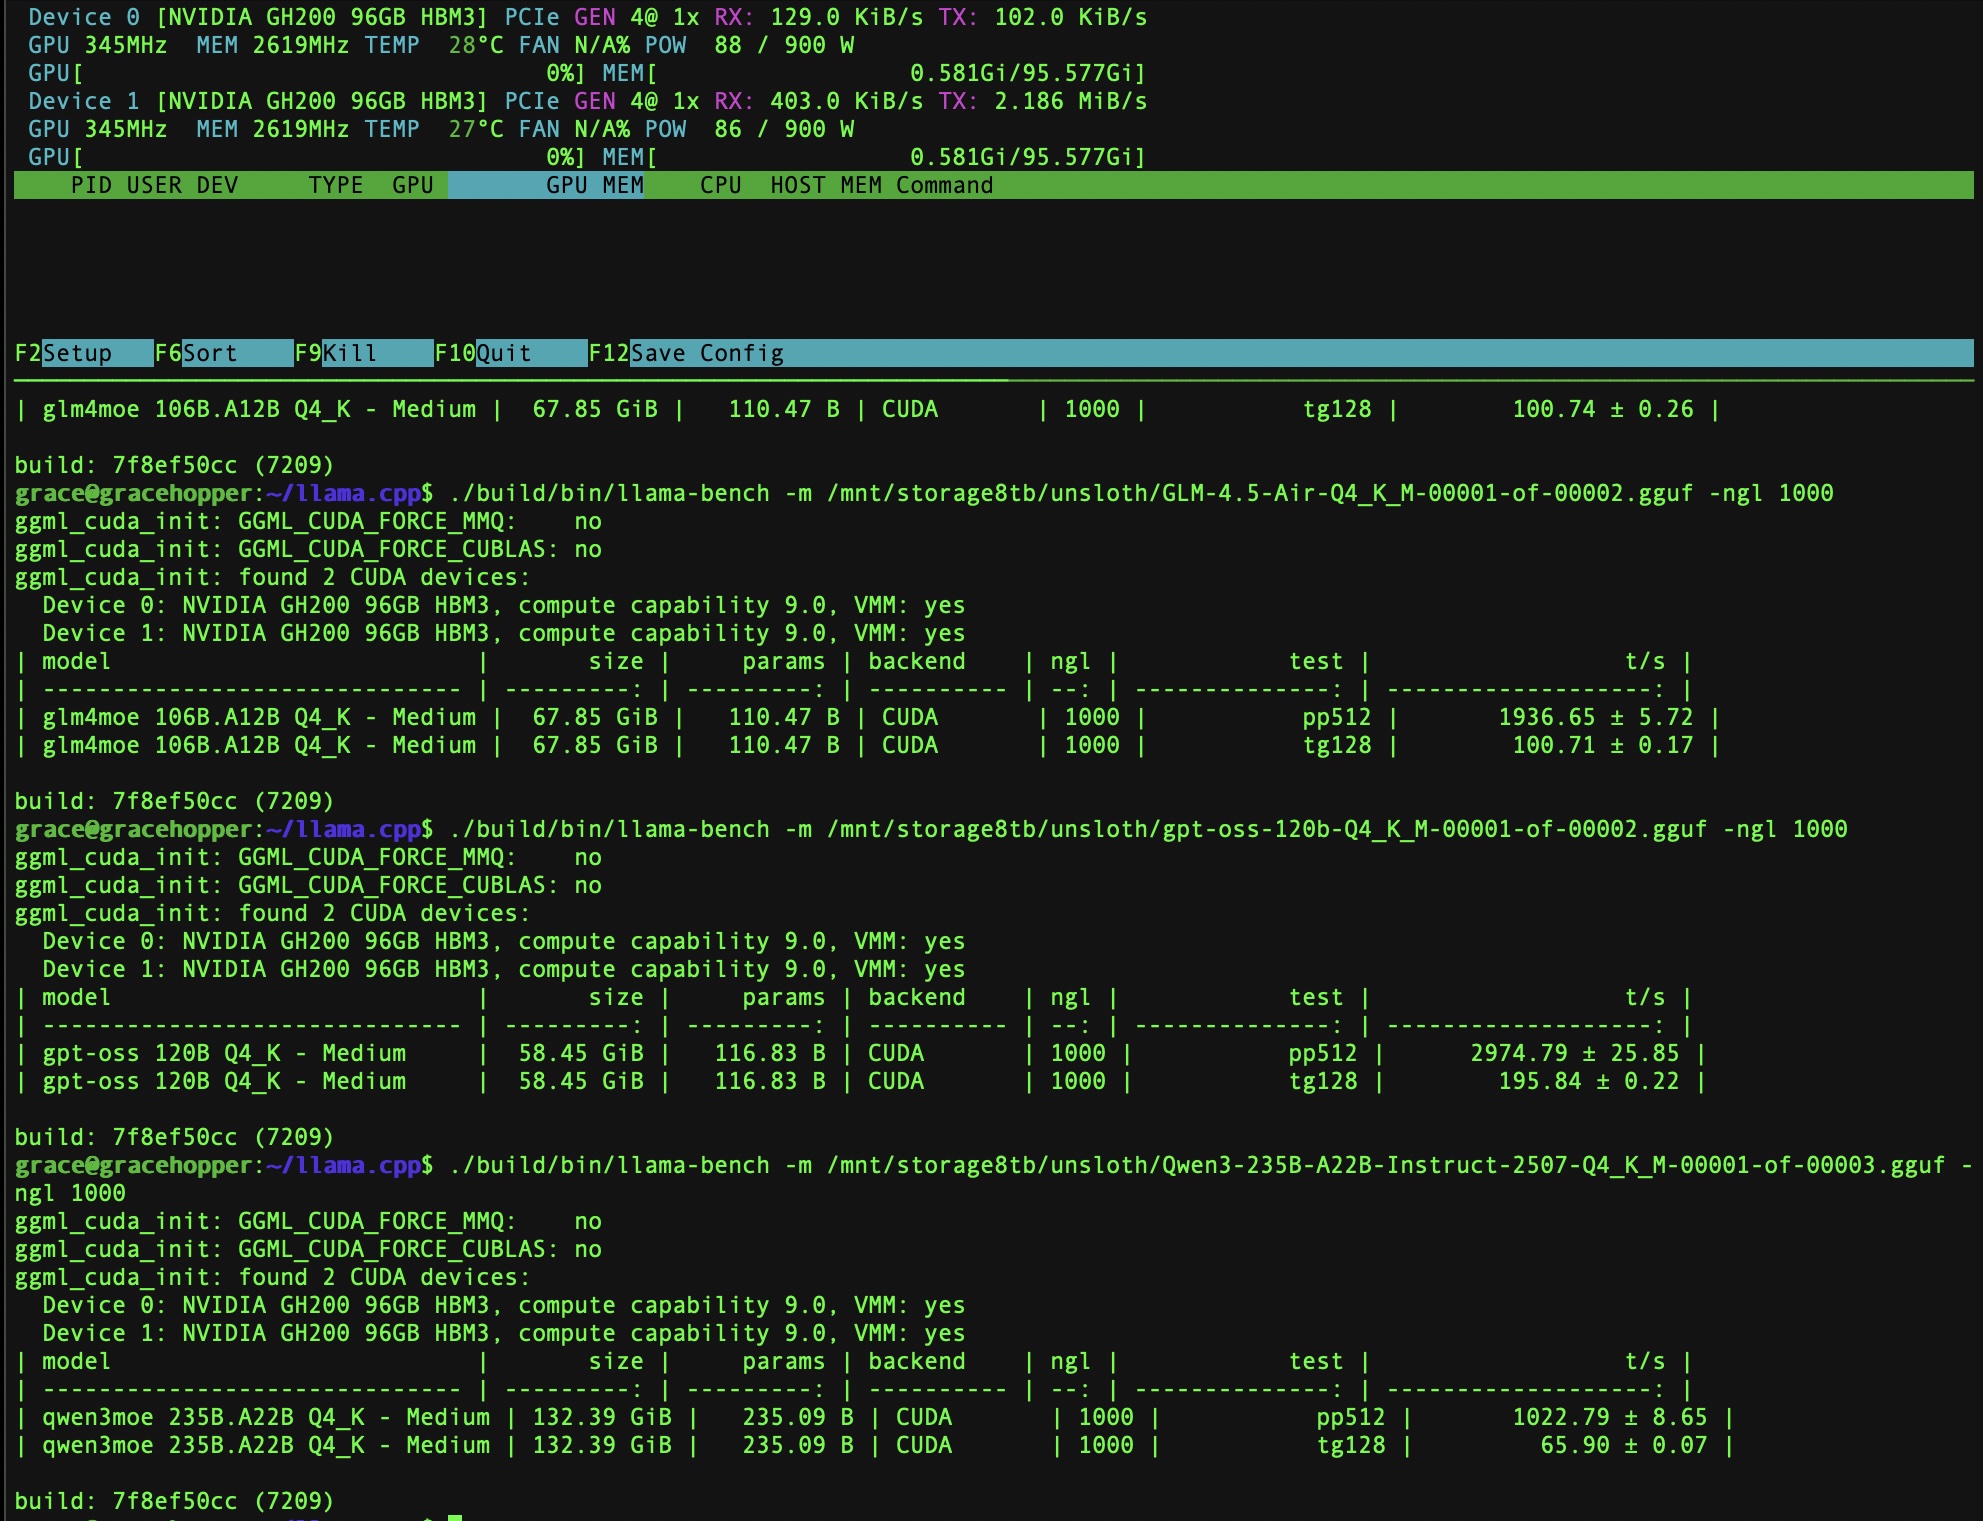
| Model | Prompt Processing | Token Generation |
|---|---|---|
| gpt-oss-120b-Q4_K_M | 2974.79 | 195.84 |
| GLM-4.5-Air-Q4_K_M | 1936.65 | 100.71 |
| Qwen3-235B-A22B-Instruct-2507-Q4_K | 1022.79 | 65.90 |
This is pretty unoptimized, but it’s looking promising so far! During the LLM tests I hit around 300W per GPU, far from the 900W max.
Cost Breakdown
Here’s what the entire build actually cost me, from the initial purchase to the final touches:
| Component | Description | Cost (EUR) |
|---|---|---|
| Grace-Hopper Server | 2x GH200 superchips with H100 GPUs (the Frankenstein special) | €7,500 |
| Storage | ‘like-new’ used 8TB E1.S NVMe SSD | €250 |
| Custom Water Cooling Adapters | 2x CNC-milled copper mounting plates for AIO coolers | €700 |
| AIO Water Coolers | 4x Arctic Liquid Freezer III 420 (B-Ware) | €180 |
| Structural Frame | Extruded aluminum profiles, pre-cut and delivered | €200 |
| Glass Front | Tinted glass front panel, pre-cut and delivered | €40 |
| 3D Printing Filament | 2x 1kg black PLA for custom mounts and brackets | €40 |
| Misc. Hardware | Nuts, bolts, and mounting hardware | €50 |
| Cleaning Supplies | 5 liters of 99.9% isopropanol (used liberally throughout) | €20 |
| 12V-5A power supply | Separate power supply for the AIO Water Coolers | €10 |
| Aesthetics | LED lighting strip (because RGB makes it faster) | €10 |
| Total | Not even over 9000 | €9,000 |
Not included: hearing protection (absolutely necessary), the microscope I already owned (but proved essential), several failed 3D prints, and the emotional cost of seeing “16,777,214°C” in system logs.
Conclusion
So, was it worth it? I now have a desktop that can run 235B parameter models at home for less than the cost of a single H100. It required disassembling $80,000 worth of enterprise hardware, debugging sensors that reported temperatures approaching the surface of the sun, and free-soldering components under a microscope. Your mileage may vary. Literally: I had to drive two hours to pick this thing up.